EasyReader Windows Getting Started Guide
 EasyReader is an eBook reading software application which supports many file formats and online libraries. It has features which make it a convenient reading tool for persons with dyslexia, low vision or blindness. Its features include:
- Support for common eBook formats such as EPUB, HTML, DOCX, CHM, Text and DAISY format.
- Direct access to many international accessible book libraries including Bookshare. Note that membership is required for most libraries for access. Some libraries like Project Gutenberg provide free access to their collection.
- Option to read with in-built TTS or screen readers
- Synchronized presentation of text and audio with word by word highlighting
- Option to adjust text size, colours, line spacing, font and margins to suit the requirements of persons with low vision and dyslexia.
- Compatible with Windows 11 tablet, laptop and desktop computers.
To know more and download visit the Dolphin EasyReader website. EasyReader can also be installed directly from the Microsoft Store.

User interface overview
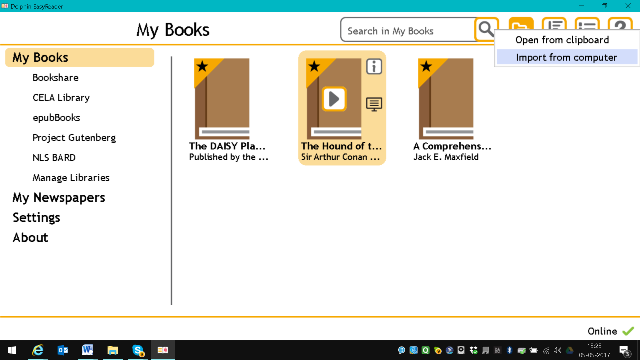
Once the user has gone past the activation and welcome dialog shown after a fresh installation, the “Bookshelf” of EasyReader is displayed. This window has a sidebar on the left with items such as “My Books”, “Bookshare”, names of other libraries and “Settings”. The controls in the top toolbar are: “Search”, “Open”, “Sort”, “Switch to list/grid view” and “Help”. The status bar displays “Online” when Internet connection is available.
When a book is opened, the TOC of the book is shown in the “Navigation bar” on the left and the book content is displayed in a bigger pane on the right. The controls in the top toolbar are: “Back to Bookshelf”, “Hide Navigation bar”, “Search”, “Skip back”, “Play”, “Skip forward”, “Text settings”, “Audio settings” and “Help”. The status bar displays the percentage book read, Time elapsed, scroll bar to navigate in the book and page navigation controls.
All the controls in the EasyReader screen can be accessed using the Tab key on the keyboard. Most controls also have an associated shortcut key. The common keystrokes are listed in the end of this guide.
Adding books to the EasyReader Library
You can import books from the device memory, CD or USB drive to add them to EasyReader Library.
Click on the Open button in the top toolbar and then click on Import from computer. Alternatively, just press the keyboard shortcut Ctrl + O. Now browse to the book location and select the file and click Open.
The copying process begins. A confirmation message is displayed when the import is complete. The book will now be available in the “My books” category in the sidebar.
Opening books from an online library
EasyReader can be used to download, open and read books from online libraries when connected to the Internet. Select the library you want to visit from the Side Bar. If the library is not listed, select “Manage Libraries” and add the library.
If login is required, enter your username and password. Browse the books using the available categories or use the search box to find the book. Note that not all online libraries provide search capabilities. In these cases, the search box will not be available.
To know more about the book, click the “Information” icon. When you find a book you want to read, click the “Download button”.
If the online library you subscribe to is supported, then you will be able to access it by clicking on “My books” in EasyReader. In this case, the changes you make in EasyReader are also synchronised with the online library bookshelf. For example, if a book is deleted from “My Books” then it is also removed from the online library bookshelf.
Navigation and playback
Depending upon the device being used, navigation and playback can be done using touch gestures, mouse clicks or keyboard commands. The commonly used commands are listed below. Please see the EasyReader online manual for complete listing of keyboard commands and touch gestures. The manual can be opened by clicking the Help button in book reading window.
| Action | Hot key |
| Play/Pause | F5 (or SPACEBAR) |
| Next synch point | DOWN ARROW |
| Previous synch point | UP ARROW |
| Select next word | RIGHT ARROW |
| Select previous word | LEFT ARROW |
| Go to headings list (repeat to close list) | CTRL + H |
| Next heading | H |
| Previous heading | SHIFT + H |
| Next heading on level 1 | 1 |
| Next heading on level 2 | 2 |
| Next heading on level 3 | 3 |
| Previous heading on level 1 | SHIFT + 1 |
| Previous heading on level 2 | SHIFT + 2 |
| Previous heading on level 3 | SHIFT + 3 |
| 10 seconds forward (only in books with audio) | CTRL + DOWN ARROW |
| 10 seconds back (only in books with audio) | CTRL + UP ARROW |
| Go to start | HOME |
| Go to end | END |
| Go to page (if pages exist in the book) | CTRL + G |
| Scroll one page down (if at end of document, it will try and navigate to next document) | PAGE DOWN |
| Scroll one page up (if at the top, it will try and navigate to the end of previous document) | PAGE UP |
| Go to next page (if page numbers exist in the book) | CTRL + PAGE DOWN |
| Go to previous page (if page numbers exist in the book) | CTRL + PAGE UP |
Change TTS voice
Any SAPI or Dolphin Sam compatible Text to speech engine can be configured to read the book text. Click on “Audio Settings” and then choose the synthesizer and the preferred voice.
Turn off the recorded audio of a book
If the book has pre-recorded audio as well as text, there may be times when you wish to turn off the recorded audio and use TTS to read the text instead. You can turn off the recorded audio of a book by deselecting the “Use book audio (option in the “Audio Settings”.
This option will not be available if you are reading a text-only book.
Tags: DAISY / EPUB / Software reading system / Windows