
Obi Automated Book Production
Obi empowers you to produce Navigable audio-only EPUB 3 & DAISY format audio-ncx book from pre-recorded content in few simple steps using an automated process. This will be greatly beneficial in scenarios where you do not wish to disturb the existing workflow of recording audio. Moreover, it will cut down on the time and resources required to work on Obi.
How it works?
While importing audio files, Obi gathers information regarding the naming conventions of the audio files from the users to parse the file names, which is used to create sections, pages, and placing audio. Also, if the files are ordered using a numeric prefix, they can be sorted in ascending order by just a click of a button; though you can do manual ordering of the files to ensure that they appear in the correct order. Furthermore, the imported audio can be split automatically at the positions determined by the phrase detection algorithm.
Step by Step Process
To get you started, one of the methods of producing a navigable DAISY format/EPUB 3 book is described here. You can do alterations in it to suit your working style.
Step 1: Work on the audio files
Before starting the process, you must make sure that you have complete audio of the book in the audio files adhering to the following rules:
- The files should be in MP3 or WAV format. Do not bother about the channels and sampling rate as Obi will take care of them while importing.
- The files should be ordered by prefixing numeric characters, such as “001”. If you skip this step, you will have to do manual ordering while importing.
- The audio of each chapter/section should be stored in a separate file.
- The name of the audio file should contain the section name exactly as it appears in the book, though the characters like “_” can be used instead of the space character; for example, “011_Hope_is_not_far.wav”.
- If the audio content of each page is stored separately, the file names should contain a page identification string, such as “Page”, followed by the respective page number; for instance, “Page_012”.
- If the chapter/section spans multiple pages, only the name of the first file should contain the section name. The subsequent files should carry the page identification string and the page numbers only; or else, Obi will create a separate section for each one of them.
The following is the snippet of the audio file names containing pre-recorded audio content of the book “The Dawn”.
01-Title.wav
02-Publisher Details.wav
002_contents.WAV
003_acknowledgements_Page_006.wav
004_Introduction_Page_007.wav
005_Page_008.wav
006_Page 009.wav
In the example above, the files are ordered by numeric prefixes that will ensure automatic ordering. These files also use “_” in place of the space character, which will be rectified during the import process. Also note that the file “004_Introduction_Page_007.wav” carries the section name, and thus its audio content will be placed in the section named “Introduction Page 007”. The subsequent files do not carry the section name, and therefore, Obi will not create a separate section for them but append their contents to the previous section; “Introduction Page 007” in this case.
We will use this example to show how the automated book production process works.
Step 2: Create a new project
To produce a DAISY format/EPUB 3 DTB, we should create a project first. Follow the instructions below to create a new project in Obi:
- Launch Obi by clicking All Programs->Obi->Obi x.x on the Start menu. You may also double click on the Obi icon on the desktop.
- Click on the Create a new project button in the Welcome dialog. The New project dialog appears.
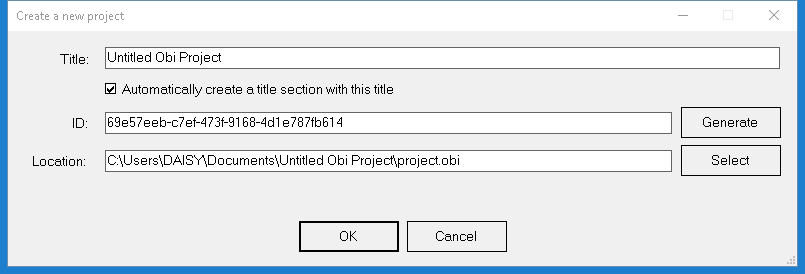
- In the Title edit box, key-in the name of the publication; “The Dawn” in the example above.
- Check the check box Automatically create a title section with this title.
- Enter the unique identifier for the publication in the ID field. You may also use the Generate button to generate an identifier automatically.
- Specify the location where the project should be created in the Location edit box. You may also browse for a location using the Select button.
- Click on the OK button. A dialog box appears enabling you to select the audio settings for the project.
- Select the sample rate for the audio of the project from the first combo box; higher values ensure better quality but consume more disk space.
- Select the desired audio channels for the project, mono or stereo, from the second combo box.
- Click on the OK button.
Obi creates a new project in the specified location and displays it in the application window. The title of the project is also shown in the title bar of Obi; “The Dawn” in our example.
Step 3: Import the audio content
Next, we will import the audio from the pre-recorded files. At the same time, we will provide information that will be used for parsing and refining the file names to create sections and pages. If the files are ordered using numeric prefix they can be sorted via the Ascending order button; otherwise we should do manual ordering in the Import audio files dialog. Additionally, we can instruct Obi to split the imported audio using the phrase detection algorithm that will make the DTB navigable at the phrase level.
Follow the instructions below to import the audio content and create the structure of the book.
- Move the focus to the Content view by pressing F6.
- Press Ctrl+I. Obi displays the dialog box to browse for the audio files.
- Select all the audio files pertaining to your book and click Open. Obi opens the Import audio files dialog.da
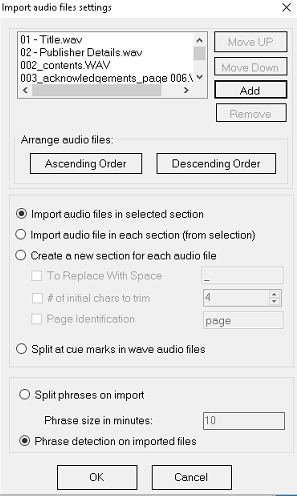
- The first list box exhibits the selected audio files. Check the list thoroughly for ensuring completeness of the audio content.
- If you missed out some files, they can be augmented to the list via the Add button.
- You can also remove redundant files by selecting them in the list and clicking on the Remove button.
- To sort the files in ascending order, click on the Ascending order button. If the files do not carry numeric ordering prefix, they can be shifted up or down in the list by using the Move up and Move down buttons.
- Check the check box Create a section for each audio file. This will enable three more controls described below. Each of them is preceded by a checkbox indicating whether or not to include the respective option in the parsing algorithm.
- In the edit box To replace with space, enter the character used instead of the space character in the audio file names. In our example, this character is “_”.
- We should remove the numeric ordering prefix from the audio file names to correct the section name. Specify the number of characters to be removed from the beginning of the audio file name in the numeric edit box Number of initial chars to trim; this will be the length of the numeric prefix. In our example, we will enter the number 4.
- In the edit box Page identification, enter the string that represents page; “Page” in our example.
- Finally, select the radio button Phrase detection on imported files that will instruct Obi to split the imported audio using the phrase detection algorithm.
- Click on the OK button. Obi will display the Phrase detection settings dialog showing the parameters to be used for detecting split points for phrases. These parameters are extracted from the Audio tab of the Preferences dialog. You may modify them if they do not represent the audio of silence of the room where the files were recorded.
- Click OK to start importing.
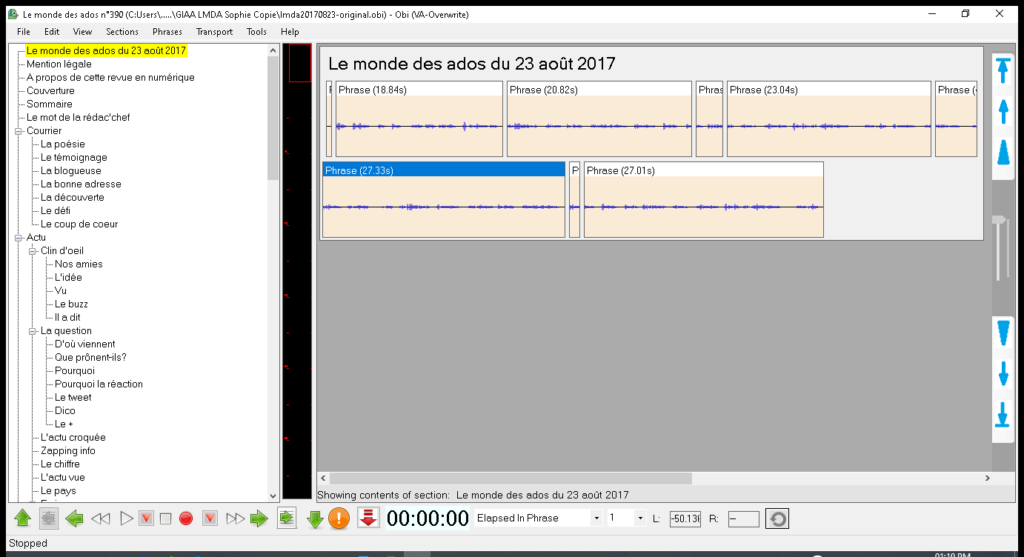
Obi may take several minutes to process the audio content. After completion, the application window will start displaying the imported content structured in sections. If the book does not have a flat structure, you will have to adjust the levels of the sections by moving them left or right in the TOC view using the commands for increasing and decreasing the level of sections. For more help, refer to Obi Help by pressing F1 in Obi.
Obi will create a section for each file carrying the section name. The contents of the page audio files will be appended to the prior section. The page audio files are the files that bear the page identification string and the respective page number, but not the section name. If the audio file name contained alphabets other than the page identification string, as in the file name “003_Acknowledgements_Page_006.wav”, it will be treated as a normal audio file and not a page audio file. Therefore, Obi will create a separate section for it and place its audio content under the section.
Obi will do the following to the snippet of our example.
“The Dawn” will become the first section of the project.
“Contents” will become the second section of the project.
“Acknowledgements Page 006” will become the third section having the page phrase numbered 6 at the end.
“Introduction Page 007” will become the fourth section containing the audio content of the file “004_Introduction_Page_007.wav” as well as the page phrase numbered 7, the contents of the audio file “005_Page_008.wav”, followed by the page phrase numbered 8, the audio content of the file named “006_Page 009.wav”, followed by the page phrase numbered 9.
Please note that after this process, you may find that the title section, present earlier, no longer exists. This will happen in the case when the name of the first audio file is different from that of the title of the project, as Obi will replace the title section with the section from the first audio file.
Step 4: Export to a DAISY format/EPUB 3 DTB
Finally, we should export the project to a DAISY format/EPUB 3 DTB as follows:
- Press Ctrl+E. The standards selection dialog appears.
- Select the standard to which the exported DTB should conform, and click OK.
- The Export dialog will be displayed, showing the path of the default export directory. You may change it if you wish to store the exported DTB somewhere else. There are some other parameters that can be enabled for exported files. For more help, see Obi Help by pressing F1 in Obi.
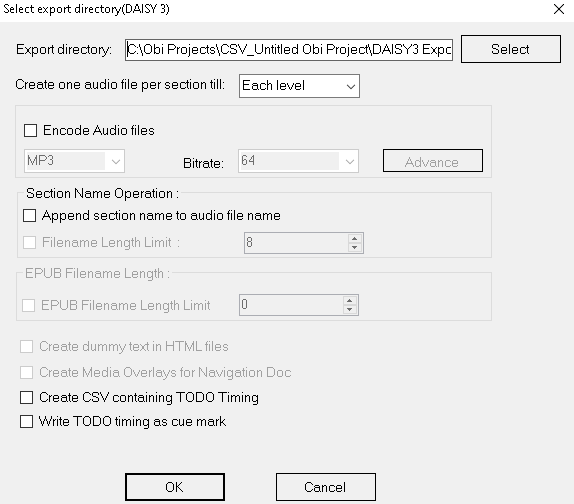
- Click on the OK button to start the export.
The project will be exported to a EPUB 3 or DAISY format DTB and stored in the directory specified in the Export dialog. With this, your DTB is ready. But before distribution, you must ensure that it is valid. To validate the exported DTB, do any of the following:
- Click Tools->DAISY 3 Validator for assuring compliance with DAISY 3 standard.
- Click Tools->EPUB 3 Validator for assuring compliance with EPUB 3 standard.
- Click Tools->DAISY 2.02 Light Validator for assuring compliance with DAISY 2.02 standard.
Work done!
Tags: Obi