
Migrating from MyStudioPC to Obi
This article is for those users of MyStudioPC who want to migrate to Obi for producing TOC only DAISY format audio books. The main difference between these two authoring tools is explained here. Further, taking the typical MyStudioPC book production workflow as a base, the steps for executing different tasks in Obi has been listed. Links have been provided for in-depth reading wherever required.
If you are new to DAISY format production and have not used MyStudioPC or Obi then we recommend that you directly adopt Obi for your DAISY format audio-only book production requirements. Obi is the newer free open-source authoring tool from DAISY Consortium and contains many advanced features as compared to MyStudioPC, the development of which has now been stopped. The DAISY Consortium website contains many step-by-step tutorials on Obi and will be a good starting point for learning to use obi.
Why choose Obi?
The unique features of Obi which are not available in MyStudioPC are:
- Supports both DAISY 2.02 & DAISY 3 format
- One of the rare audio-ncx production tools providing complete support for creating skippable structures like footnotes and annotations.
- Personalization by the way of customizing keyboard shortcuts per user preferences.
- Supports internationalization – can be easily localized into various languages.
- Meticulously devised recording process catering to the need of both beginners and advanced users; main attractions being advanced recording mode to gear up the recording process and slim recording toolbar enabling narrating and execution of recording commands concurrently.
- Highly efficient workflows like Automated book production from pre-recorded audio files reduce manpower requirements.
- Enables utilization of existing resources via the import feature, whereby users can import project from full-text full-audio book & audio-NCX DAISY 3 books, structure from DTBook XML & XHTML files, audio from WAV & MP3 files.
- Provides facility to mark the error phrase on the fly as To do while recording as well as at the time of editing.
- Can be further customized for encompassing special requirements as it is open-source.
Difference between user interface of MyStudioPC and Obi
The main screen of MyStudioPC is divided horizontally into two parts. The top half is the Section list and the bottom part displays the phrases in the selected section. The difference in Obi is that its screen is divided vertically, the left pane is the sections list called the TOC VIEW and the bigger window on the right side is the CONTENT VIEW.
In MyStudioPC the sections list is arranged in a table where the depth of a section (level) is displayed as a number e.g. 1,2,3… on its left. Whereas in Obi the sections list is presented in the familiar windows explorer style tree view where its level is evident from its position in the tree. Since a node in the tree can be collapsed or expanded, it is possible to quickly jump to section of the same level skipping sections of a deeper level.
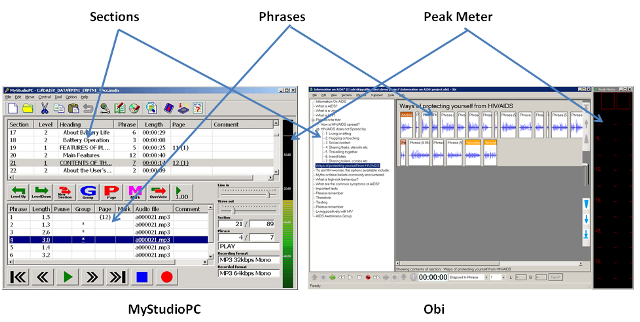
In MyStudioPC the phrases are presented in a table where each phrase occupies one row. Information about the phrase such as its length, Page marking, and audio file name are displayed on the same row in different columns. The audio wave form of the phrases is not displayed simultaneously and it can be seen only in the phrase splitting window.
The phrases arrangement is totally different in Obi. Each phrase resembles a rectangular box with a label at the top displaying its length (in time). All the phrases contain a waveform which is visual representation of the audio contained in it. When the audio corresponding to the phrase is being played, an audio cursor moves along the waveform, highlighting the playback position.

The PEAK METER which displays level of the input sound is an integral part of the MyStudioPC whereas in Obi it can be displayed alongside the Obi screen or hidden as per users choice. The bigger dual channel peak meter in Obi is supplemented by a keyboard accessible Textual Peak meter at the bottom of the screen that displays the amplitude (in decibels) of the audio being recorded or played.
The application window of Obi is highly customizable to accommodate needs of various types of users. Obi provides zooming of text and graphics as well as zooming of the audio wave form for fine grain editing with mouse. In addition various segments of the Obi application window can be hidden or resized by the user. For a detailed explanation see the topic EXPLORING THE GUI in Obi manual. To open the Obi Help Manual press F1 when Obi is open or click HELP > CONTENTS in the menu.
Navigation in the user interface
Obi has a simple yet comprehensive user interface with logical grouping of menu items and self-explanatory dialog boxes that make Obi easy to learn. Obi has carefully designed set of intertwined views enabling visual users to work simultaneously in various views on a single application window. At the same time, facilitating non-visual users to navigate through the views giving the notion of separate windows.
Obi is not self voicing like MyStudioPC but it provides full accessibility by way of support for screen readers(even for the less sophisticated open source screen readers), keyboard navigation, magnification of text and graphics and audio clues.
In MyStudioPC the TAB key is used to move between the sections and the phrases list. Whereas in Obi the F6 key is used for the same purpose. In Obi, keyboard users will need to select a section in the TOC VIEW using UP/DOWN arrow key and then press F6 to move the focus to the CONTENT VIEW which will then expose the phrases present in the selected section. Hereafter you can press the RIGHT arrow key to navigate to all the phrases present in the section. If you now want to go to another section, you can press F6 again to move to the TOC VIEW to select another section or make use of keyboard shortcuts CTRL+SHIFT+DOWN and CTRL+SHIFT+UP to move to next or previous section respectively.
In Obi it is also possible to take the keyboard focus to the TRANSPORT BAR by pressing CTRL+F6. The TRANSPORT BAR, located near the bottom of Obi window, is a toolbar that provides the controls for playing or recording audio, audio monitoring, and navigation. Note that in MyStudioPC such controls can be accessed only with keyboard shortcuts.
For more details on navigation in Obi see the topics NAVIGATING AMONG VIEWS and OBI’S VIEWS AND CONTROL BARS in the Obi manual.
Keyboard users must checkout the complete list of Obi keyboard shortcuts otherwise playback and editing in phrases may be confusing.
Creating a new project
The process of creation of new project in Obi is not too different from MyStudioPC. after clicking on Obi icon on the desktop or in the start menu, in the “welcome to Obi” dialog that opens click on the “CREATE A NEW PROJECT” button. Alternatively, like MyStudioPC, for creating a new project in Obi you can click FILE menu > NEW PROJECT or press CTRL+N.
A CREATE A NEW PROJECT DIALOG is displayed where you have to enter the project title, directory for saving and an identifier that is a unique number for the project. The “AUTOMATICALLY CREATE A TITLE SECTION WITH THIS TITLE” checkbox in this dialog when checked automatically creates the first section in the project with the same name as you have entered for the title of the project.
You are prompted to choose the audio settings for the project e.g. audio sampling rate and channels both by MyStudioPC and Obi while creating a new project. The noticeable difference here is that Obi does not allow you to record directly in MP3 format. However, Obi can import both MP3 and WAV files and export audio in MP3.
MyStudioPC brings up the “BOOK INFORMATION” dialog at the end of the new project creation process. In Obi such dialog is not displayed at this time. You can click VIEW menu > SHOW META DATA VIEW at any time to edit the Meta Data.
In Obi it is also possible to create a new project by importing existing files.
Opening, closing and saving projects
The files created by MyStudioPC and Obi in the project folder are totally different. In MyStudioPC project folder you can find SMIL files, AUDIO files and a NCC.IMDN file. In Obi project folder you will find a DATA folder and a file with the .OBI extension. Unlike the NCC.IMDN file you can double click the .OBI file to open the project. Further, when Obi is launched you can click the OPEN THE LAST PROJECT BUTTON in the WELCOME DIALOG or in the Obi window click FILE menu > RECENT PROJECTS.
In Obi the project must be saved frequently to minimize the risk of losing important data. The asterisk (*) following the project title in the TITLE BAR of Obi indicates that there are unsaved changes. To save the project, click FILE->SAVE PROJECT on the menu or press CTRL+S. The project will be saved in the location where it is currently placed. Obi will save the changes made by you automatically if the AUTO SAVE option is turned on. To modify the Auto Save settings, open the PROJECT PREFERENCES TAB of the PREFERENCES DIALOG by clicking TOOLS > PREFERENCES.
Creation of book structure
In MyStudioPC creation of book structure involves inserting sections (SHIFT+INS) and then changing its name and level in the properties. In Obi there are more options for creating sections. There are menu items and keyboard shortcuts for add section, add sub-section, insert section, rename section etc. The most visible difference in working with structure is that in MyStudioPC the sections list is presented as a linear list in the top half of the screen whereas it is organized as a tree-view in Obi in a pane on the left side.
Recording
Like MyStudioPC, Obi also has a test recording mode called the MONITORING MODE which can be activated by a single click on the RECORD BUTTON or by the keyboard shortcut CTRL+R. Pressing CTRL+R second time or clicking the RECORD BUTTON again starts the recording. Remember to activate the PEAK METER before starting the monitoring mode. Visually impaired users should enable the AUDIO CUES to get feedback of the level of input audio in monitoring mode.
Obi provides an advanced recording mode that enables options such as Start recording from cursor erasing the following audio, Always record directly from transport bar and Allow overwrite. To enable the advanced recording mode or audio cues, click Tools > Preferences, and then in the Audio preferences tab choose your options.
MyStudioPC users will also appreciate the TODO PHRASES marking feature of Obi. You can mark those phrases as TODO on which work has to be done. For example while reading the book the narrator can place the TODO mark at the place where a mistake has been made simply by pressing the F9 key without even stopping the recording. The book editor will then be able to easily locate this position for editing.
Note that the audio input volume can be selected from within MyStudioPC whereas in Obi the input volume has to be adjusted from the windows default volume control.
Another noticeable difference between these two tools is that In Obi phrase detection at the time of recording is optional. By default one phrase will be created for each session of recording. The phrases so created may contain a large chunk of audio and should be split into small phrases using auto-splitting or by manual editing.
Live recording is not the only option for filling audio in a Obi project. There are several options for importing audio files including an option to automatically create a project using set of audio files having prescribed file names.
Editing
Editing the project involves deleting unwanted noise and silence and making the phrases meaningful by splitting/merging them wherever required. The main difference MyStudioPC users will find in Obi is the option of performing PHRASE DETECTION post recording and the facility to undo the phrase detection and re-apply it with different values. The other most visible difference is that the wave form of phrases is always visible in Obi and performing various operations like selection, deletion is very easy with the mouse.
Clean-up the project
The CLEAN-UP UNREFERENCED AUDIO function in Obi serves more or less the same purpose as the BUILD BOOK function of MyStudioPC. After completing the recording and editing of the project in Obi, you should invoke this command by clicking TOOLS menu > CLEAN UNREFERENCED AUDIO or by pressing the keyboard shortcut CTRL+L. This will modify the audio files and permanently delete their unwanted portions. Make sure you perform the clean-up only after completing the editing of the project since this process cannot be undone.
Meta Data
META DATA in Obi is same as BOOK INFORMATION in MyStudioPC. The METADATA VIEW can be shown or hidden by selecting VIEW->SHOW METADATA VIEW from the menu or pressing CTRL+ALT+M. It is hidden by default. The METADATA VIEW in Obi contains a list of the Meta Data items and an edit area below it for modifying their values.
Finalize: Prepare distribution version of the book
In Obi it is essential to export the project to DAISY format for creating a distribution version of the project. Since this is the last step in book production in Obi you should ensure beforehand that you have included all the content of the book in Obi project, the structure of the project i.e. sections match that of the print book and that you have entered all required Meta Data.
To export the project, click TOOLS->EXPORT AS DAISY on the menu, or press CTRL+E. You will then be prompted to select the DAISY standard to which the exported DTB should comply. In the next dialog box you can choose a location for the exported book and opt for MP3 compression. Two new features introduced by Obi here are the option to append the section name to the end of audio file names and the option to limit the number of audio files in the project. Both these options have been provided for benefit of those users who read DAISY format books on players that do not fully support the DAISY format. After exporting, you must validate the book to ensure its compliance with DAISY standards.
The exported DTB can be played using a DAISY format player. If you had chosen to export in DAISY 3 format you will have to open the .OPF file present in the exported DTB in the compatible player.
Additional features in Obi
Given below is a list of some of the additional features not described above.
- Generate audio using preferred synthetic voice: Obi enables you to generate audio for page phrases announcing page numbers using synthetic voice.
- Skippable notes: Footnotes, annotations, producer notes etc. can be created using Obi.
- Automated book production enabled via audio file import: The Import audio file settings dialog has been enhanced to enable the process of automated book production. It performs automated arrangement of imported audio files according to the structure of the book by parsing their file names.
- Fine navigation: Nudge command is very useful for determining the correct position while audio editing. So it is essential for the shortcut keys of the nudge operation to be as simple as possible. This is where fine navigation comes handy. Fine navigation command maps the Left and Right arrow keys to the backward and forward nudge operations respectively.
- Live waveform creation: Obi has introduced live waveform creation, whereby it draws the waveform of the audio being recorded concurrently.
- Replacing audio of selected item with external audio: Obi enables you to replace the audio of the selected phrase or section by external audio content via the context menu of Content view. This command is very useful in the case when you have to perform audio processing (amplification, normalization, etc.) using external tools, like Audacity, etc.
- Floating Recording toolbar: It is devised to facilitate book narrators to record the contents displayed on their computer screen conveniently. It provides an exhaustive set of controls required for recording book contents and marking structure at the same time.