
Tobi Project and DTB Creation
Contents
1. Tobi Project
1.1. Importing a Document or an Existing Book
1.2. Opening an Existing Project
1.3. Saving and Closing
1.4. Cut, Copy, and Paste
1.5. Undo and Redo
1.6. Data Cleanup
1.7. Backup and Recovery
2. Document and Text
2.1. Document Elements
2.2. Navigating to an Item
2.3. Selecting an Item
2.4. Expanding and Narrowing Sub-items
2.5. Finding an Item
2.6. Editing Text
2.7. Editing Structure
2.8. Document Marks
2.9. Toggling Granularity of the Document
3. Audio and Waveforms
4. Image Descriptions
5. Publishing the Book
5.1. Book Metadata
5.2. Pre-export Validation
5.3. Exporting the Project
Tobi Project
Tobi project can be thought of a unit of data, metadata, and some settings that are required for creating a DAISY or EPUB book. Project’s data is organized in the application window of Tobi using various segments to give both a large picture and focused view. The commands are presented by toolbars and the menu bar of Tobi. Apart from these, there are other entities that facilitate navigation to specific elements. To get a complete know-how of Tobi’s UI, refer to User Interface of Tobi.
Tobi structures the project data for DAISY and EPUB books differently because of the disparity in the way that they store their textual data. To understand the Tobi project for EPUB book and its special commands, please refer to Creating or Modifying EPUB Media Overlays. To know how an individual project directory is organized see Project and Application Directories.
Importing a Document or an Existing Book
As Tobi presently acts as a re-purposing tool, you require a base in the form of a text document or an existing book to republish it into a full-text, full-audio digital talking book. If you are starting from scratch, you can type-in the material in Microsoft Word or Open Office and then use the “Save as DAISY” add-in to convert it into an XML document in DTBook format. It is recommended to create all the headings, pages and other skippable elements before saving the document as DAISY; though you can take the advantage of the text editing and the structure editing features of Tobi to correct typos or modify the structure of the document later.
The following formats can be imported in Tobi:
- DTBook.xml
- EPUB 3 text-only book
- Full-text, full-audio DAISY 3 book
- EPUB 3 audio media overlays
The step by step process of importing a text document or an existing book is listed below.
- Click File->Import on the menu bar or press Ctrl+I. Tobi opens a dialog box to let you browse for the required file.
- Look for .xml file in case of DTBook, .opf file for DAISY book, and .epub file for EPUB book.
- Select the appropriate file and click on the Open button. Tobi will display a dialog for selecting the audio format for the project as shown in the figure below.
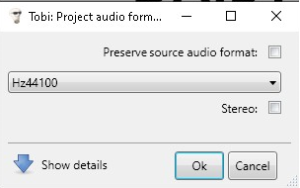
- Choose the sampling rate to be used for audio files of the project from the combo box; higher the sampling rate, better the audio quality and thus more disk space required.
- If you wish to use stereo channels for audio, check the checkbox Stereo; leave it unchecked for mono channel.
- To preserve the audio format used by the source publication, check the checkbox Preserve source format. In this case, Tobi will override any selections made in this dialog by the audio format of the publication being imported.
- Recheck the selections made by you; once selected, the audio format can not be changed for the project.
- Click on the OK button.
Tobi will create a project directory in the “_XUK” folder in the same directory as your document file, and create the project file(s) as well as other data and synchronization files therein. Thereafter, it will display the data of the document in the application window of Tobi, which will be text and graphics in the case of DTBook or EPUB text-only book. But if you are importing a DAISY book or EPUB media overlays, Tobi will also import its audio data.
You can also import a document in Tobi by dragging it from another resource, such as Desktop, and dropping it in the application window of Tobi. After you drop the file in Tobi, Tobi will open the dialog prompting you to select audio format to be used in the project; follow the process from step number 4 listed above.
Once the project is opened, you get full access to all its contents as well as settings. If you are a new user, it is advisable to first get acquainted with the components of the user interface, which are elaborated in User Interface of Tobi.
Opening an Existing Project
Tobi maintains a record of recently opened projects, which is enumerated in the submenu of File->Open recent in reverse chronological order. Each item of the submenu displays the full path of the project file and the last item of the submenu, Clear, enables you to empty the list of recent projects. The same can also be achieved by using the Open Recent dialog, which can be invoked by clicking File->Open recent… on the menu bar or by pressing Shift+Ctrl+O. The Open Recent Dialog informs if any of the recently opened projects is missing. It also facilitates some other actions like deletion of the missing shortcuts and searching for the required project.
It is most likely that you will be able to find the desired project in the recent projects list. If not, you can browse for the project file (with .xuk extension) by clicking File->Open on the menu bar or by pressing Ctrl+O. An alternative way to open an existing project is to drag the project file from another resource and drop in Tobi.
Saving and Closing
You can save the opened project manually by clicking File->Save on the menu bar or by pressing Ctrl+S.
You can also instruct Tobi to save the project file (with .xuk extension) automatically each time it is modified. Check the checkbox EnableAutoSaveProject in application preferences to activate it. Consequently, every command that updates the project file will also trigger auto-save for the file. Auto-save usually has a disadvantage that even the wrong actions by the user will be saved automatically, but users can always revert to a previous state by using the Undo and Redo commands.
If you wish to save the file in a different location, follow the steps listed below:
- Click File->Save as… on the menu bar or press Shift+Ctrl+S.
- Tobi will confirm if you wish to remove the redundant data before saving a copy of the project. Click Yes to confirm or No to continue without running the data cleanup command.
- Thereafter, you will be presented with a dialog box to browse for a location where the project should be saved. Choose the desired directory, enter an appropriate name for the new copy, and click Save. Tobi will copy all the contents of the project at the new location.
- Subsequent to the completion of the save command, Tobi will enquire if you wish to open the newly saved copy. Click Yes to open the newly created copy or No to keep working on the prior copy.
To close the project, click File->Close on the menu or press Ctrl+F4. If there are unsaved changes, Tobi will ask to save them. Click Yes to save or No to close the project without saving. You can also close the project by exiting Tobi using the shortcut Alt+F4.
Cut, Copy, and Paste
Like all other applications, the cut, copy, and paste commands of Tobi enable you to copy data from one place to another. You can execute these commands for audio content via three resources: using Edit menu, from Main toolbar, and by keyboard shortcuts. But as text editing is enabled through a separate dialog box, you can not access menu bar or toolbars and therefore should use keyboard shortcuts for these commands. The menu items and shortcut keys for executing the commands are:
- Cut: Edit->Cut or Ctrl+X
- Copy: Edit->Copy or Ctrl+C
- Paste: Edit->Paste or Ctrl+V
Tobi has a clipboard of its own to hold an item that is cut or copied till the time it is used by the paste command to insert it at the current or marked location. Tobi’s clipboard also interacts with other applications, and thus, you can also copy and paste data to and from other applications.
Undo and Redo
Tobi maintains a stack of actions executed in current session empowering the users to reverse the actions that haven’t produced desired results. To undo the last executed action, click Edit->Undo on the menu bar or press Ctrl+Z. The Undo command will have two-fold effect:
- The modifications made by the last operation will be reversed.
- The undone action will be saved to the Undo stack of Tobi.
Now, if you want to redo the undone operation, click Edit->Redo on the menu bar or press Ctrl+Y. The last undone operation will be executed again. You can redo all the operations undone in a row.
Please note that you can use these commands even after saving the project.
Data Cleanup
When some graphical or audio content is deleted, it is not removed from the disk but just delinked from the project. This is done with the view that users may undo the delete command and thus reinstate the content. Moreover, the audio content may be human voice recording and in such a case it may become difficult to arrange for it again. Similarly, the images may also be useful outside the scope of the project. Therefore, Tobi leaves deleted audio data in the project and provides cleanup commands to remove it at a later time.
Tobi provides the following two commands for performing data cleanup:
- Complete cleanup: Parses the entire audio data of the project for unreferenced audio. To perform complete cleanup, click Edit->Cleanup (complete) on the menu or press Ctrl+Alt+D.
- Optimized cleanup: Parses only those audio files that were not cleaned earlier and thus increases the efficiency of the cleanup operation in the network based deployment of Tobi. It may, however, ignore some minor changes in the previously cleaned files. To perform optimized cleanup, click Edit->Cleanup (Optimized) on the menu or press Ctrl+Shift+Alt+D.
Tobi will compile the deleted data and store in the folder named “___Deleted” under the project directory. Subsequently, it will open the folder enabling you to view the deleted files. You can choose to remove all them at once or inspect each of them before removing.
The complete cleanup process arranges the audio data files in the order of the book and numbers them sequentially. Also, it creates the files of the size specified in CleanAudioMaxFileMegaBytes application preference, which can be altered using the Preferences dialog; fewer, larger files will help in reducing the load time when the project is fetched via a network. If you choose the value of the application preference as “0”, Tobi will create one file per phrase.
Tobi also lets you reverse the last cleanup operation by clicking Edit->Cleanup Rollback on the menu. This command will reinstate the removed unreferenced audio back in the project. Please note, for the rollback to execute successfully you must ensure that the physical data has not been removed from the folder containing the deleted files.
Backup and Recovery
Tobi creates backup of the project file with execution of each command. The backup file bears the .autosave extension, and can be found under the project directory itself. This backup file is very useful in scenarios when system hangs or crashes abruptly, as users may not have an opportunity to save the project. In such a case, work can be resumed by simply replacing the project file with the backup file.
Additional backup files are created each time user saves the project. These files carry the time stamp of the time when the project was saved.
Document and Text
The textual and graphical data of the project is exposed in the Document pane (F6) of Tobi in the same order as it will appear in the exported DTB. The font used for the text of the document is displayed in a combo box embedded in the Document toolbar (F10), which can be used to modify the font of the entire document. The font size and font style can not be changed and therefore should be configured before importing the document in Tobi. You may change it manually in the project file, however, it is not recommended as it may render the project invalid.
Pages are marked distinctively by a grey horizontal line and their listing also appears in the Pages tab of the Navigation pane (F8), which can be used to navigate to the desired page directly. Similarly, you can navigate to images using the Descriptions tab and document marks using the Marks tab. Likewise, there is a hierarchical listing of headings under the Headings tab that can be expanded and collapsed for easy exploration.
The structure of the document for the currently selected item is displayed in the Document Structure Trail. It will list the parent items starting from the root element (beginning of the body of the document). For example, if you are at heading number 2 in the Document pane, the Document Structure Trail will display Book, Frontmatter, Level1, Level2, and H2. In addition to figuring out the position of current item, the Document Structure Trail can be used for navigating to or selecting any of its parent items. Keyboard users can go to the Document Structure Trail by first navigating to the Document pane by pressing F6 and then pressing Tab twice.
Document Elements
The elements of document are not treated differently in Tobi, except for the images that can have descriptions corresponding to them. However, their know-how will not only give a clear picture of the structure of your publication, but also enable you in formulating set of rules for creating their audio equivalent. For example, you might want to change the pitch slightly for the audio of the headings, use different synthetic voice for a skippable element such as a side bar, or supply an extra voice tag to linked elements. Typically, there will be following types of elements in a document:
- Book/Body: The root element of the document, basically used for editing purposes.
- Doctitle: Title of the publication.
- Heading: Heading of a section, chapter, etc.
- Plain text: Textual content corresponding to preceding heading or title.
- Image: Graphical elements of the document.
- Page: Page break including the page number.
- Other skippable elements: The elements that can be skipped in DTB such as side bars, foot notes, etc. The skippable elements that are referenced from another element (anchor) will be linked to the respective anchors through a hyperlink.
Navigating to an Item
There are numerous methods to navigate to the items in the Document pane. You can traverse the whole document sequentially, move within items of one type, or jump to a specific item. Tobi provides various resources to facilitate navigation so that user spends least time searching for the desired item.
The most vital resource is the Navigation pane that enables users to move directly to special elements: headings, pages, images, or marks. It also eases navigation to plain text of document if you know its location. For example, to move to some text on 14th page, you can do the following:
- Go to the Navigation pane by pressing F8.
- Switch to the Pages tab by pressing Ctrl+Tab repeatedly till you reach there.
- Mouse users can simply double-click on number 14 in the list, and keyboard users can use Down Arrow to reach there and press Enter when number 14 is encountered. Tobi will display page item numbered 14 in the Document pane.
- To move the focus there, press F6.
- Thereafter, you can move sequentially up and down to arrive at desired text.
The commands to move sequentially in the Document pane are presented in the Document toolbar and the Text menu. You may also use keyboard shortcuts for the same.
- To move to the next item, click Text->Select next phrase on the menu bar or press Ctrl+Period. Alternatively, you can use the Select next phrase button of the Document toolbar.
- To move to a previous item, click Text->Select previous phrase on the menu bar or press Ctrl+Comma. You can also use the Select previous phrase button of the Document toolbar for the same.
Another way of moving to an item, taking the advantage of the hierarchy of the XML document, is by using the Document Structure Trail. Each element of the trail is succeeded by a small triangle that envelopes the list of its children. To navigate to any of them, press Enter on the appropriate triangle to open the list and select the desired item from the list thus opened. For example, if you are currently on a sub-element of front matter of the document and you wish to move to body matter, click on the triangle immediately after the Book button. Tobi will open a list showing the child elements of Book element. Select bodymatter from the list and focus will move there directly. Please note that if you click on any button representing XML element, such as frontmatter, Tobi will only make a higher selection and not navigate to it.
You can also move the focus to the linked elements, such as foot note, annotation, etc., by using the following commands:
- To move to the associated skippable element, click Text->Follow link on the menu or press Ctrl+L.
- To move back to anchor, click Text->Go back to link on the menu or press Shift+Ctrl+L.
Selecting an Item
Whenever you navigate to an item in the Document pane, it automatically gets selected. However there are two types of selections in Tobi: lower selection and higher selection. Lower selection is the selection that can be considered as actual selection in Tobi as almost all the commands operate on this selection. It is highlighted by a green background and all the navigation commands listed in previous section make a lower selection. Please note that unless stated explicitly, the term “selection” will signify lower selection in the manual.
The higher selection, denoted by white smoke background, is made by clicking on the buttons of the Document Structure Trail. In this case, the lower selection is not disturbed and thus most of the operations will still be executed on earlier item. But some of the operations, such as expanding/narrowing the sub-items and generating text for the entire document, will execute on the higher selection.
Expanding and Narrowing Sub-items
These commands are specifically designed for the Document Structure Trail and execute on the higher selection. To execute these commands, first make a higher selection by clicking the appropriate button on the Document Structure Trail; for example, if you want to select the doctitle element, click on the button named Doctitle. Keyboard users can reach there using Tab and then pressing Enter. Thereafter, use any of the following:
- To display the sub-items of the higher selection in the Document Structure Trail, click Text->Expand selection on the menu or press Shift+Ctrl+Comma. Alternatively, you can use the Expand selection button of the Document toolbar.
- To hide the sub-items of the higher selection, click Text->Narrow selection on the menu or press Shift+Ctrl+period. You may also use the Narrow selection button of the Document toolbar to achieve the same.
Finding an Item
In addition to deterministic navigation, where you know the exact location, Tobi provides a find function that enables you to locate any item containing a word or a phrase. You can activate the find function by clicking Tools->Find on the menu bar or by pressing Ctrl+F. The find command opens a dialog box displaying an edit box to type the search term, a Find next button to find the first entry matching the search term after the current position, and a Find previous button to look for an item containing the search term before the current position.
You may also use the same search term again to find another matching item without invoking the Find dialog. Use the following commands:
- To find next item containing the same search term, click Tools->Find next on the menu bar or press F3.
- To find a matching item prior to the current item, click Tools->Find previous on the menu bar or press Shift+F3.
Editing Text
Tobi enables you to edit the textual content of a node in the document. Using this feature, you can correct spellings, add missing words, or remove redundant words. It opens the Edit Text dialog displaying the text from the selected node. If the selected node contains children, each one of them will be opened one by one, starting from the first child node. For example, if you select a paragraph node (“p”), Tobi will display the contents of the first “sent” element, then second, and so on.
To edit the contents of a node, do the following:
- Go to the item that you wish to edit. You can use the navigation commands or search function for the purpose.
- Click Text->Edit text on the menu bar or press F2. Mouse users can use the shortcut Alt+Click on the item to be edited. Tobi will pop up a dialog box displaying the contents of the current item.
- Make the corrections and click on the OK button.
- If the selected node has more than one child, Tobi will open the Edit Text dialog again with the contents of the second child. This process will continue till the contents of the last child of the selected node have been displayed.
For instance, consider the following XML node:
<sent id=”n10″>Visit us at: <w>daisy.org</w></sent>
If you press F2 on this node, Tobi will first display the text fragment “Visit us at:” in the Edit Text dialog, and thereafter, the fragment “daisy.org”.
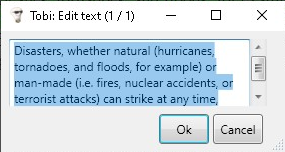
Please note that you can cancel text editing by clicking on the Cancel button in the Edit Text dialog.
Editing Structure
Warning: This feature is for the advanced users who are well aware of the DTBook and HTML mark-up. Please make a copy of the project before performing structure editing, as incorrect mark-up may render the project invalid.
Tobi empowers you to edit the structure of the document. This can be very useful in the scenario where you find some discrepancies with the actual document during production, as you may not wish to change the underlying document and do all the work again.
The commands for structure editing can be found in the submenu of Text->Edit structure and will enable you to perform the following actions:
- Delete fragment: Delete the selected text fragment from the document.
- Copy fragment: Copy the selected text fragment to the application clipboard.
- Cut fragment: Delete the selected text fragment and store it in the application clipboard.
- Paste fragment: Paste the text fragment from the application clipboard at the desired location: as the first child, as the last child, before the current location at the same depth, or after the current location at the same depth. To better understand how the fragment will be pasted, see the examples given in the description of Insert custom XML dialog below.
- Insert page break: Insert a numbered page break at the current location.
- Insert custom XML: Insert new XML element and the corresponding content; such as sentence, paragraph, etc.
All the above commands work on the higher selection; therefore, you must use the nodes (buttons) on the Document Structure Trail to select an item. Also note that the structure editing commands can be executed on only those items that do not have audio corresponding to them.
The Insert custom XML and the Insert page break commands open a dialog box. It lets you enter the content to be inserted and its position with respect to the current location. The following list explicates the fields of the dialog box.
- First inside: Insert the XML element as the first child of the selected item. For example, if you select a paragraph, by clicking on the “p” node in the Document Structure Trail, and try to insert a sentence, it will appear at the beginning of the paragraph in the Document Pane. The newly inserted sentence will thus become the first sentence of the paragraph.
- Last inside: Insert the XML element as the last child of the selected item. For example, if you select a paragraph and you try to insert a sentence, it will appear at the end of the paragraph in the Document Pane. The newly inserted sentence will thus become the last sentence of the paragraph.
- Before: Insert the XML element before the current element as its sibling. For example, if you select a paragraph and try to insert another paragraph, it will be inserted prior to the selected paragraph at the same depth. In the Document Pane, the newly inserted paragraph will appear above the selected paragraph.
- After: Insert the XML element after the current element as its sibling. For example, if you select a paragraph and try to insert another paragraph, it will be inserted subsequent to the selected paragraph at the same depth. In the Document Pane, the newly inserted paragraph will appear below the selected paragraph.
- Element name: The XML tag to be inserted; such as, “sent”, etc.
- Text content: The actual content of the element.
- Page label (number): When you choose to insert Page number, this field will be displayed instead of Element name and Text content fields. Enter the page number for the new page break.
- Advanced XML: Lets you insert a fragment with XML mark-up. If you provide a value to this field, the Element name and Text content fields will be ignored.
Please note that if no text content was entered for the newly inserted element, it will not be shown in the Document Pane. However, it will appear in the Document Structure Trail.
Tobi’s in-built validator warns you if you insert incorrect mark-up. For example, if you insert “h1” XML element under “p” element, Tobi will open the Validation dialog showing the mark-up error. For information on the valid structure of DTBook, refer to http://www.daisy.org/z3986/structure/SG-DAISY3/index.html.
Document Marks
Tobi enables you to place any number of document marks in your document. All the document marks will be listed under the Marks tab of the Navigation pane, which can be used to move the focus on the marked item directly. To include the current item in the list of document marks , either click Text->Document marks->Toggle document mark on the menu or press Ctrl+K. Note here that this command is used both for marking as well as removing the document mark ; therefore, if used twice it will remove the mark.
Toggling Granularity of the Document
You can toggle the granularity at which the commands for working with document elements execute. This feature enables users to work at both the higher levels such as a paragraph, or lower levels such as sentence or word. The application preference “EnableTextSyncGranularity” enables you to toggle the granularity of the document. If you set the preference to FALSE, document will be organized for finest granularity. Otherwise, the document will be organized for coarse granularity as listed in the application preference “TextAudioSyncGranularity”. A quick method to switch between both the levels of granularity is to use the keyboard shortcut Shift+Ctrl+Alt+T.
This command is very beneficial in improving the recording flow while narrating the contents, as you can narrate the whole paragraph before giving the Stop Recording and Continue command. Please note that to record at the paragraph level, the preference “EnableTextSyncGranularity” should be set to TRUE.
Audio and Waveforms
Audio insertion and editing consumes maximum time while creating a full-text, full-audio digital talking book using Tobi, especially if you have decided to provide human voice recording. Although you may use pre-recorded audio files for the purpose but still they should be mapped to their text equivalent using the editing features. The audio functionality of Tobi is elaborated in a separate tutorial: Audio Insertion and Editing.
Image Descriptions
Tobi incorporates image description workflow that will prove very beneficial for book readers, if used judiciously. With this functionality book authors can supply verbal or pictorial depictions of the image intelligible by the intended audience. Descriptions can be of various types catering to the special needs of addressees. For instance, long descriptions will equip the readers with every minute detail of the image, simplified language descriptions will explain the difficult concepts in basic language to slow learners, and tactile image description will provide a tactile depiction of the main image.
To understand and use the image description feature, refer to Image Description Manual.
Publishing the Book
Once you have supplied all the contents to your publication and inspected it thoroughly, it is ready to be published. But before going further, you should check metadata for comprehensiveness and correctness of information. Thus, the last steps for creating your DTB are:
- Fill up and inspect the book metadata.
- Export TO DAISY/EPUB DTB.
The subsequent sections explain both the workflows in detail. But for information specific to EPUB books, please refer to the section Publishing EPUB book.
Book Metadata
Although Tobi will import metadata while importing text document or digital talking book, but it might not be complete or valid after the transformation. So you should examine its contents thoroughly and add the missing entries. Note here that Tobi supports metadata types enumerated in DAISY 3 and EPUB 3 specifications only; therefore, it will import the custom types but they will not be available for editing. There are some other rules associated with metadata types about their existence. Some of the metadata types are required, which means that you are not allowed to omit them. Others are optional and thus can be omitted. Still others are recommended, which means that Tobi does not place any restriction on adding or removing them but it will be better to include them in the metadata of your book. Furthermore, some of the metadata types can exist only once while others can have multiple entries.
The entire functionality for adding, editing, or removing metadata is enclosed in the Metadata Editor, which can be invoked by clicking Edit->Edit metadata… on the menu bar or by pressing F11. Metadata entries are presented in a tabular structure where each row contains one entry and the columns exhibit the following:
- Name: Name of the metadata entry; also known as metadata type. For example, dc:Language.
- Content: Value of the metadata entry. For instance, en-US.
- Errors: A message giving the information about inappropriateness of data entered in the Content field.
- Primary Id: A checkbox indicating whether or not to mark the metadata entry as primary identifier. As you may have more than one identifiers for a DTB, you should mark one of them as primary to distinguish your book. If you do not mark any identifier as primary, Tobi will choose one automatically at the time of export.
- Delete button: The delete command to delete the metadata entry. If the metadata entry is required, the delete button will be disabled.
A short description of the selected entry will be displayed beneath the table to facilitate the users in providing appropriate data in the Content field. Tobi will also state whether the selected metadata entry is required, recommended, or optional via the description. Additionally, the error message in the Errors column will tell you if there are any formatting errors. You can rectify the contents by moving the focus to the Content column by using Tab repeatedly or simply clicking on it. Thereafter, you can type or edit the data therein.
In addition to editing the contents of existing metadata entries, Tobi enables you to add a new entry by following the steps listed below:
- Click on the Add new item button at the bottom of the editor dialog. A new row will appear at the top of the table of metadata entries and Tobi will move focus to it.
- Select the metadata type from the combo box in the Name field.
- Press Tab to move to the Contents field and type-in the data.
- Check the Errors field for any message by pressing Tab. If there are some errors rectify them. You can find the information about the metadata type in the Descriptions area underneath the table.
- If the newly created entry should serve as primary identifier for the DTB, check the checkbox in the Primary ID column.
You can create any number of metadata entries by repeating the process listed above. After performing the modifications, click on the OK button to commit the changes to the project. If you press Cancel, all the changes will be removed. Please note that you can undo all the modifications made in the Metadata Editor at once by using the Undo command after exiting the dialog.
If you leave out the required metadata entries, the DTB will not be valid as per DAISY or EPUB specifications. You can get the information about such entries while validating the book. Tobi automatically calculates and supplies values to some of the metadata entries, such as total duration, at the time of export. But you have to supply values for most of them.
You can also import the metadata entries from the default metadata of Tobi, if you had saved it earlier, by clicking the Import defaults button.
Pre-export Validation
To validate your project before exporting, click Tools->Validate on the menu that opens a dialog box listing the validation errors. It also gives an option to copy the errors to the clipboard, so that you can paste them in your chosen word processing software and go through them conveniently.
By default, Tobi’s pre-export validator inspects all the elements for missing audio. It may however be desirable not to include some particular type of elements in this check. One example of such elements is pages. In the books like novels, reader may not be willing to hear the page number announcement as it disrupts the flow of text.
You can instruct Tobi’s validator to skip some elements while checking for missing audio by listing them in the application preference ValidMissingAudioElements and turning on the preference ValidMissingAudioElements_Enable. For pages, the string value given to the preference ValidMissingAudioElements is “pagenum”. Please note that you must restart Tobi for these changes to take effect.
Exporting the Project
After you are through with authoring and editing the book, you should publish it as per EPUB or DAISY specifications via the export function of Tobi. Please note that to export the EPUB book, you must first open the project spine; for more information, refer to Publishing EPUB book.
To export your project to a full-text, full-audio digital talking book, follow the steps listed below:
-
- Click File->Export on the menu or press Ctrl+E. The Export dialog appears as shown below.
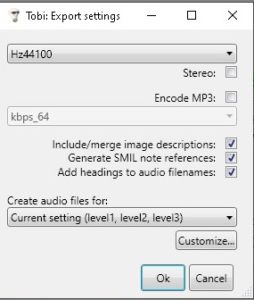
- Select the sampling rate from the combo box; higher the sampling rate, better the audio quality and hence more disk space required.
- If you want Tobi to use stereo channels in audio files, check the checkbox Stereo. For mono channel, leave the checkbox unchecked.
- If you wish to have audio files in MP3 format, check the checkbox Encode MP3.
- To instruct Tobi to include image descriptions in DAISY book, check the checkbox Include/Merge image descriptions. Otherwise, the descriptions will only be exported to the DIAGRAM descriptions directory.
- It is recommended to check the checkbox Generate SMIL note references that ensures that anchors are linked to their references, such as footnote, etc., in the exported DTB. Please note that this option will also be disabled for the EPUB export.
- If you want the exported audio files to have the respective section names, check the checkbox Add headings to audio filenames. You can also restrict the size of the filenames by specifying the maximum length in The AudioExportFileNameSectionHeadingMaxLength application preference of Tobi.
- Click on the OK button.
Tobi will export the project to a DAISY 3 full-text, full-audio book or EPUB media overlays, depending on the underlying project. Thereafter, it will open the directory to which the files have been exported. For information on how the project directory is organized, refer to Project and Application Directories.
Tags: Tobi