
Tobi User Interface
Contents
1. Overview
2. Application Window
2.1. Layout
2.2. Document Pane
2.2.1. Zooming Document Pane
2.2.2. Document Structure Trail
2.3. Navigation Pane
2.4. Audio Editor Pane
2.4.1. Scaling Waveforms Horizontally
2.5. Toolbars
2.5.1. Main Toolbar
2.5.2. Document Toolbar
2.5.3. Audio Toolbar
2.6. Menu Bar
2.7. Status Bar
3. Magnification
4. Editors
4.1. Audio Editor
4.2. Image Descriptions Editor
4.3. Metadata Editor
5. Utility Dialogs
5.1. Application Preferences
6. Exiting Tobi
Overview
The user interface of Tobi is conscientiously devised to provide a customizable, navigable and convenient platform for creating or modifying a full-text, full-audio digital talking book. The main application window encapsulates a set of panes, toolbars and menu items that provide access to the document elements and entire functionality to work on them. In addition to the application window, there are editors and utility dialogs to execute specific tasks such as creating image descriptions or modifying the application settings.
Application Window
The application window of Tobi is a blend of various views and controls that collectively facilitate the process of creating a multimedia DAISY/EPUB book. Document’s data is presented in three panes in different styles: one exposes the contents of the document and is termed as Document pane, the other provides rapid access to the special elements and thus called Navigation pane, and the third displays audio waveforms enabling users to work on them and therefore called Audio Editor pane. These panes are separated by dividers which can be dragged to adjust the height and/or width of the panes. The dividers can only be accessed by mouse and can be easily located by visual users as they get highlighted as soon as mouse pointer moves over them.
Functions required to work on the document are organized in toolbars as well as menu bar. Additionally, Tobi provides an exhaustive set of keyboard shortcuts that are quite beneficial for visually impaired as well as advanced users. The current state of Tobi is informed through Status bar, which provides general as well as audio-specific information.
Tobi uses the default color scheme of Windows operating system for most of the UI elements, and thus, will adjust automatically to the changes made in the display properties of the system; for instance, if the user switches to the high contrast mode, the same will be reflected in Tobi’s UI. However, there are some elements, such as audio waveforms or document elements, for which the colors have been defined internally and are listed in the Preferences dialog. The Preferences dialog also displays the default layout options for the application window, visible/hidden state of toolbars, and window size among many others. For information on how to use the Preferences dialog, refer to the section Application Preferences.
The next section describes the layout of the application window of Tobi and the sections that follow will elaborate on each of its components.
Layout
As with most of the Windows applications, Tobi’s menu bar resides on the top of the application window. Main toolbar, containing button controls for basic operations, is positioned beneath the menu bar. Thereafter, Tobi’s screen is divided in three large segments called panes.
The segment touching the left edge of the application window is called Navigation pane and enables quick navigation to special elements such as heading, pages, etc. Document pane, which spans largest area of the application window, exposes entire contents of the document. It is placed on the right of the Navigation pane and is surrounded on the top and bottom by Document Structure Trail and Document toolbar respectively. The area below these two panes is spanned by Audio Editor pane, which displays audio waveforms horizontally and Audio toolbar beneath them.
At the bottommost part of application window, Tobi provides information about its current state via Status bar.
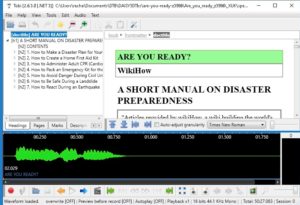
Document Pane
Document pane forms the basis of Tobi as it displays document’s data and enables the users to view, traverse and work on it. Each paragraph is clearly displayed and the current selection is highlighted by a distinct color for the base and font. At the same time, it is indicated by a finger (on the left) pointing towards it. The page phrases can easily be distinguished as they are marked by a grey horizontal line with page numbers written in the leftmost corner.
You can move the focus to the text in the Document pane by clicking View->Focus->Document text on the menu bar or by pressing F6. Although the Document pane is designed to expose entire contents of the document, but you can choose to view only the selected item at a time by clicking View->Single phrase mode on the menu bar or pressing Ctrl+T. Alternatively, you can check the checkbox Single phrase on the Document toolbar. The Single phrase command works on the lowest level of granularity, which could be a sentence, a heading, or an image.
The contents of the selected item can be edited by clicking Text->Edit Text on the menu bar or by pressing F2. You can also make structural changes to the document, as explained in the topic Editing Structure under Tobi Project and DTB Creation. The commands for navigating within the Document pane or working with document elements can be found in the Text menu as well as the Document toolbar. You can also use keyboard shortcuts to speed up the process.
Zooming Document Pane
Users can magnify or shrink the Document pane, without affecting other UI components, by using the magnification slider on the rightmost edge of the Document toolbar.
Document Structure Trail
The horizontal list of buttons on the top of the Document pane show the lineage of the highlighted item, and is analogously named as Document Structure Trail. It is very useful in determining the position of the highlighted item in the document. Keyboard users can reach here by first moving the focus to the Document pane text by pressing F6, and then pressing Tab twice.
![]()
Another important usage of the Document Structure Trail is to make higher selections. To make a higher selection, simply click on any of the buttons forming the hierarchy, or move the focus to the required button by pressing Tab repeatedly, and then press Enter. You can also make lower selection using this resource. Each button is succeeded by a small triangle that enfolds the list of its children. If you click on it or press Enter there, a list gets opened. To move the focus on an item, simply select it from the list.
Navigation Pane
Navigation pane, as the name suggests is a panel to navigate to a specific place in the document such as heading, a document mark, etc. It is organized in four tabs; each containing a sequential or hierarchical listing of the type of elements indicated by the tab name. For example, the marks tab will contain the list of document marks of the document in the same order as they appear in the document. You can move the keyboard focus to Navigation pane by clicking View->Focus->Navigation pane on the menu bar or by pressing F8.
The horizontal list of tab names is displayed at the base of the Navigation pane, which can be traversed using the left and right arrow marks before and after the list respectively. You can view the contents of a particular tab by clicking on the tab name or by pressing Ctrl+Tab repeatedly until you land on it. Tobi will then display the list of items under that category.
To navigate on the required item, simply double-click on the item name in the list and it will be displayed in the Document pane. If the item name is not visible in the current view, you can locate it by using the scroll bar on the right to scroll through the list vertically. Keyboard users can achieve the same by using the Up Arrow and Down Arrow keys of the keyboard to traverse through the list of items vertically, and press Enter when the required item is encountered.
Audio Editor Pane
Audio Editor pane displays a horizontal list of waveforms representing the audio content of the selection. If the selection is nested, the audio waveforms corresponding to each of its sub-items will also be displayed, and this horizontal listing will follow the document order. The waveforms are separated by a thin blue line to distinguish them from each other, and their durations (in seconds) are shown on top of them. The upmost edge of Audio Editor Pane contains a ruler quantifying time, which marks out the position of each blue separating line.
At the extreme right end of the Audio Editor pane, Tobi displays a peak meter to facilitate users in examining audio quality graphically while audio monitoring or recording.

Below the waveforms, the Audio Editor pane presents Audio toolbar, offering controls for playback, recording and audio editing. To shift the focus to the Audio toolbar, click View->Focus->Audio toolbar on the menu or press F7.
Scaling Waveforms Horizontally
The contents of the Audio Editor pane will be zoomed in or out automatically when you use global magnification commands. But there are some magnification commands that act exclusively on the Audio Editor pane and are listed below.
- Zoom on selection: Elongates or squeezes an audio selection along the x-axis. It is presented in the form of a slider touching the right edge of the Audio toolbar. You can also execute this command by clicking Audio->Zoom->Zoom on selection on the menu or by pressing Shift+Ctrl+W.
- Fit in view: Scales all the waveforms, currently exhibited in the Audio Editor, horizontally to fit in the visible area of the Audio Editor pane. It is situated just before the slider. This command can also be executed by clicking Audio->Zoom->Fit in view on the menu or by pressing Ctrl+W.
- Reload audio: Reloads the audio content currently exhibited in the Audio Editor pane, and consequently brings the waveforms to their normal form. This command can be invoked by clicking Audio->Zoom->Reload audio on the menu bar.
You can also zoom the exhibited waveforms by mouse wheel scroll. Use Ctrl key along with the mouse wheel scroll to zoom in or zoom out the waveforms. Keyboard users can use the numeric keys (1 to 9) in combination with Ctrl key to achieve the same effect; Ctrl+0 being equivalent to Ctrl+W (the Fit in view command). If the keyboard focus is in the Audio Editor Pane, the numeric keys can be used without the Ctrl key to zoom in and out the waveforms. These audio zoom commands can also be accessed via the Menu Bar.
Toolbars
Tobi’s toolbars are horizontal list of button controls that provide quick and easy access to most of the operations of Tobi. The classification of commands in toolbars is based on the entity that they will act on; for example, all the commands required to work on the audio content of the project are organized in the Audio toolbar. There are three toolbars in Tobi: Main toolbar, Document toolbar, and Audio toolbar.
Keeping in mind the diverse working preferences of users, Tobi’s toolbars are designed to toggle their visibility. A toolbar can be shown or hidden by both mouse and keyboard as follows.
- Mouse users can place the mouse pointer on the left edge of the toolbar, which gets highlighted to point the location to click for hiding it. To display the toolbar again, move the pointer at the same location and click when the boundary of toolbar is shown.
- Keyboard users have a fairly simple method to achieve the same. Use the respective shortcut key to land on the toolbar and press Enter, which will toggle the visibility off or on. For example, to hide the Document toolbar, press F10 and then Enter.
The shown/hidden state of toolbars is saved in the application settings and can be modified via the Preferences dialog.
The sections that follow will introduce the toolbars of Tobi and will list down the commands offered by them.
Main Toolbar
The Main toolbar can be located under the menu bar of Tobi and presents general commands for working in Tobi. The toolbar is depicted in the figure below and the table that follows describes the commands offered by it. To move the keyboard focus to the Main toolbar, click View->Focus->Main toolbar on the menu or press F9.
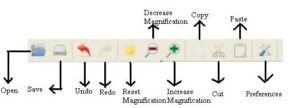
| Command | Functionality |
|---|---|
| Open/Import | Open an existing project, or import a text document or a DAISY 3/EPUB 3 book. |
| Save | Save the current project. |
| Undo | Undo the last action. |
| Redo | Re-execute the last action that was undone. |
| Reset magnification | Reset the zoom level of the user interface to default. |
| Decrease magnification | Zoom out; shrink the elements of the user interface. |
| Increase magnification | Zoom in; magnify the elements of the user interface. |
| Copy | Copy audio to the application clipboard. |
| Cut | Delete audio from the current position and place in the application clipboard. |
| Paste | Paste the contents of the application clipboard at the current position. |
| Preferences | Open the Preferences dialog for viewing or modifying application settings. |
Document Toolbar
The commands enveloped in the Document toolbar enable users to execute operations relating to the Document pane, and is thus positioned at the bottom of it. The toolbar is illustrated in the following figure, and its commands are explicated in the table below the figure. Keyboard users can avail the commands presented by the Document toolbar by clicking View->Focus->Document toolbar on the menu or by pressing F10.
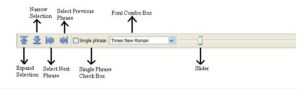
| Command | Functionality |
|---|---|
| Expand selection | Show the sub-items of the higher selection in the Document Structure Trail. |
| Narrow selection | Hide the sub-items of the higher selection in the Document Structure Trail. |
| Select next phrase | Select the next item (sentence, paragraph, image, etc) in the document. |
| Select previous phrase | Select the previous item in the document. |
| Auto-adjust granularity checkbox | If checked, the commands Select Next Phrase and Select Previous Phrase will automatically go the chunk of text to which audio can be synchronized. |
| Font combo box | Enables users to change the font used for the text in the document. |
| Horizontal slider | Enables users to magnify or shrink the items of the Document pane |
Audio Toolbar
The Audio toolbar offers commands to place audio, hear playback, and edit the audio content of your project. The figure following this text depicts the Audio toolbar, and the table subsequent to it explains the function of each control of the toolbar. You can move the focus to the Audio toolbar by clicking View->Focus->Audio toolbar on the menu or by pressing F7.
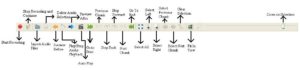
| Command | Functionality |
|---|---|
| Start recording | Start recording audio from the input device to the current location. |
| Stop recording and continue | Wind up the audio content recorded till now to the current item and start recording for the next item. |
| Import audio file | Import a WAV, MP3, MP4, or AUK file. |
| Generate TTS | Generate audio for the current selection using text to speech synthesizer. |
| Delete audio selection | Delete the audio content within the selection. |
| Preview before | Preview the audio content just before the current position of audio cursor or beginning of audio selection. |
| Play/Pause audio playback | Start or pause the playback. |
| Preview after | Preview the audio immediately following the cursor position or left boundary of audio selection. |
| Play auto advance | Instructs Tobi to start continuous playback of the entire project, starting from the current item. |
| Go to start | Move the audio cursor to the beginning of the current waveform. |
| Previous chunk | Go to the beginning of the previous waveform (the audio content corresponding to previous item of the document). |
| Step back | Nudge the audio cursor backwards by a very small amount of time. |
| Step forward | Nudge the audio cursor forward by a very small amount of time. |
| Next chunk | Jump to the beginning of the waveform corresponding to the next item. |
| Go to end | Move to the end of current waveform. |
| Select all | Select the entire audio content of the current waveform (highlighted item of the document). |
| Select left | Select the audio content from the beginning of the waveform corresponding to current item till the audio cursor. |
| Select right | Select the audio content from the position of audio cursor to the end of waveform corresponding to the current item. |
| Select previous chunk | Select previous waveform (the audio content corresponding to the previous item of the document). |
| Select next chunk | Select next waveform. |
| Begin selection | Mark the beginning of audio selection. |
| End selection | Mark the end of audio selection. |
| Clear selection | Clear audio selection; it will remove the begin selection and the end selection marks created by the users. |
| Fit into view | Stretch or compress the waveforms horizontally so that they fit in the full view of the Audio Editor pane. |
| Zoom on selection | Stretch or compress the current audio selection. |
Menu Bar
The menu bar provides access to most of the commands of Tobi. The classification of commands is done judiciously to facilitate the users in locating them under meaningful heads. The heads as well as items of menu bar can be accessed using mnemonics; for instance, to access File head, use Alt+F. Once a menu head is activated, you can traverse it using Up Arrowand Down Arrow, or use the mnemonic corresponding to an item to activate it directly. Each menu item includes its corresponding keyboard shortcut, if any. A hint about the menu item is given via tooltip for visual users, and accessible description for screen reader users.
The list below describes the heads of the menu bar. Please note that menus are generated dynamically, so the listing below may not match the order they appear in your system.
- File (Alt+F)
- The File menu provides commands to open/import, save, and close the project. It also enables users to export the project to a full-text, full-audio DAISY 3 book or an EPUB 3 media overlays.
- View (Alt+V)
- The View menu enables users to zoom the UI, shift the focus to a pane or toolbar, toggle the mode of the Document pane, and open the Narrator View.
- Help (Alt+H)
- The Help menu provides commands to access online help using your web browser.
- Tools (Alt+O)
- The Tools menu wraps up the commands to find an item in the current view, validate the exported project, browse the folders used by Tobi or the current project, and open the Preferences dialog.
- Edit (Alt+E)
- The Edit menu provides basic editing commands such as cut, paste, undo, etc. It also enables users to edit metadata and image descriptions. Furthermore, it includes the cleanup operation to remove unused audio.
- Audio (Alt+A)
- The Audio menu contains the commands for recording, playback, navigating, selecting, and editing audio. In addition to these, it also lists some other commands that relate to audio or waveforms such as Zoom on selection.
- Text (Alt+T)
- The Text menu enfolds commands for working in the Document pane, which include commands for expanding or narrowing higher selection, navigating to an item, placing or removing a document mark, and editing text/structure.
Status Bar
Status bar informs current state of Tobi as well as provides comprehensive information relating to audio. It can be reached using the shortcut key F4 and is divided in various sections that can be traversed using Tab. The information provided by each section is listed below in the same order as it will appear in the Status bar.
- Current state of Tobi: Information about the current operation is provided here. For example, “Recording…” signifies that recording is in progress.
- Playback rate: The current rate of playback. “Playback X 1” indicates that playback rate is multiplied by 1. When you increase the playback rate, it will start showing “Playback x 2” indicating that playback rate is multiplied by 2; then, “Playback x 3” and so on.
- Select after Record (Off/On): Informs if the newly recorded content will be selected after recording or the cursor will be placed at the end of it. You can enable or disable this recording mode by clicking on it or pressing Enter.
- Record overwrite (Off/On):Informs whether recording will be executed in the overwrite mode or not. You can enable or disable this recording mode by clicking on it or pressing Enter.
- Preview before recording (Off/On): Informs whether Tobi will preview audio at marked position before initiating the record command. To toggle the behavior, either click or press Enter on this section.
- Auto play (Off/On): Informs if the Auto play option is turned off or on. You can activate or deactivate it by clicking on it or pressing Enter.
- Bit rate, sampling rate, and channel: Informs the bit rate, sampling rate, and channel selected for the project. Please note that these items can only be selected before the conception of project and can not be changed thereafter.
- Position of audio cursor: Current play-head position (in time) as indicated in the Audio Editor pane. Please note that this position is relative and is calculated from the beginning of the first waveform displayed in the Audio Editor pane.
- Duration of audio selection: Length (in time) of the audio selection. This segment will be enabled only if an audio selection is marked.
- Total audio content: Duration of entire audio content in the project.
- Audio augmented in current session: Duration of the audio content added to the project in the current session.
Please note that the time values will be in “hh:mm:ss.ms” format, where “hh” denotes hours, “mm” denotes minutes, “ss” denotes seconds, and “ms” denotes milliseconds.
![]()
Magnification
Tobi has a built-in magnification feature that is developed keeping in mind the needs of partially sighted users. Users can magnify, shrink, or reset the UI zoom to default by using the keyboard shortcuts or the submenu of View->Magnification. The commands presented by this submenu will zoom the entire UI. There are some other magnification commands that may be used on specific elements, and are elaborated in the respective sections; for instance, the command Zoom on selection scales the audio selection along the x-axis, and is described under Audio Editor pane.
The magnification commands that act on all the elements and components of the user interface are listed below.
- To magnify the UI, click View->Magnification->Increase magnification on the menu, press Ctrl+Plus Sign, or click on the Increase magnification button of the Main toolbar.
- To shrink the UI, click View->Magnification->Decrease magnification on the menu, press Ctrl+Minus Sign, or use the Decrease magnification button of the Main toolbar.
- To reset the UI to default size, click View->Magnification->Reset magnification on the menu, press Shift+Ctrl+Minus Sign, or use the Reset magnification button of the Main toolbar.
Editors
Editors enable users to edit a specific type of content of a Tobi project. Presently, there are three editors that act on audio, image descriptions, and metadata. Every editor is supplied with a comprehensive set of operations to create and edit that particular type of data. The next three sections will provide information on the editors of Tobi.
Audio Editor
The Audio Editor comprises of a visual display, exposing audio content in form of waveforms, and the Audio toolbar, offering commands to work on them. It is included in Tobi in the form of a pane and is described in the section Audio Editor Pane.
Image Descriptions Editor
The editor used for editing image descriptions is presented as a dialog box. It can be opened in any of the two modes: basic and advanced. In the basic mode, it enables you to add one description for each description type. On the other hand, the advanced mode of Image Descriptions Editor contains entire functionality to edit descriptions in their full-fledged forms. There is a separate document to explain the image description feature and its editor in detail: Image Description Manual.
Metadata Editor
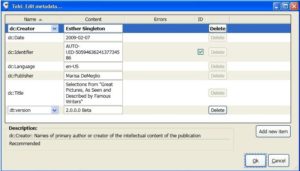
Metadata Editor enables users to view or modify the metadata of the book and can be invoked by clicking Edit->Edit metadata… on the menu bar or by pressing F11. It displays metadata items in form of a table, where each row is mapped to one metadata item and the columns represent the following:
- Name: Name of the metadata type.
- Content: Value of the metadata entry.
- Errors: Space to display any formatting error in the value of the respective metadata entry.
- Primary ID: A checkbox signifying whether the metadata entry serves as the primary identifier for the publication or not.
- Delete button: Enables users to delete the respective metadata item. If the metadata item is required, the Delete button will be disabled.
Beneath the table of metadata entries, the Metadata Editor displays description of the current metadata type, informing what type of value is expected, its format, and information relating to its existence. A new item can be added to the metadata by using Add new item button, positioned under the right edge of the table. Clicking on this button will result in creation of a new row at the top of the table, where you can select the metadata type and enter a value for it. The process of creating and modifying metadata entries is detailed in Tobi project and DTB Creation.
You can also save and import the default metadata using the Import defaults button, which opens a dialog box displaying the default metadata entries in the form of key-value pairs. To import the default entries in your project, click OK. The default entries will be copied to the project’s metadata. If a metadata entry already exists in the project with the same name as that of the default metadata entry, Tobi will not overwrite the existing entry but create a new entry instead, unless the identical entry is non-repeatable. In such a case, the existing entry will be replaced by the default entry.
The following sample from the Default Metadata dialog illustrates how the key-pair will look like:
dc:Creator
first-name last-name
dc:Title
Title-of-book
dc:Publisher
publisher-name
When you use this feature for the first time, you will have to key-in the default metadata entries in the text box provided in the Default Metadata dialog. Thereafter, you can simply import the saved entries anytime in Tobi projects. Also note that any changes made to the key-value pairs in the text box will be saved to the default metadata of Tobi when you click OK.
Utility Dialogs
There are numerous utility dialogs in Tobi that enable you to perform simple tasks, like searching for an item, to complex ones, such as modifying application preferences. Most of them will be described in the context where they may be used. In conjunction with this, Preferences dialog will be described here.
Application Preferences
The application preferences (application settings) of Tobi can be modified using Preferences dialog, which can be opened by clicking Tools->Preferences on the menu or by pressing Ctrl+Alt+F1. Like the Metadata Editor, it also presents the data in the form of a table, where each row corresponds to one setting and the columns exhibit the following information:
- Checkbox: Enables you to select the current item for inclusion in the list of the application settings to be reset to the default value.
- Setting: An application setting; for example, “Audio_ButtonBarVisible”.
- Value: The value to be used for it; for example, “True”.
- Default: The default value set by Tobi for the setting.

There is a search bar above the table that lets you type some text and search for the required application preference. After keying-in the text, you can use the Find next button to search for the matching item subsequent to the current selection. To look for the required setting before the current selection, use the Find previous button. For example, to find the application preference to change the font color, type “color” in the edit box and click on the Find next button repeatedly till you find it.
To change the value of the selected application preference, press Tab twice. You will reach the control enabling modification of the value for the preference. This control may be a checkbox for setting the preference to true or false, or a combo box presenting multiple options for selection. As soon as you modify the value, it will reflect in the value field corresponding to the application preference.
The application preferences can be set to their default values anytime. To include a setting in the list of the items to be reset, check the checkbox in the list corresponding to the item. After making all the selections, click on the Reset selected button.
Exiting Tobi
You can exit from Tobi by clicking File->Exit on the menu or by pressing Alt+F4. You will be inquired by a message to confirm if you really want to exit from Tobi to eliminate the chance of accidentally giving this command. Thereafter, you will be prompted to save the project if there were any modifications in currently opened project. Take appropriate action before closing to ensure that no important work is lost.
Tags: Tobi